Welcome to our guide on how to connect a daylight switch to your lighting system. The daylight switch is a device used to switch lights on and off, depending on the ambient light level. This is a great way to save energy and reduce your electricity bill. In this article, we will show you step-by-step instructions on how to connect a daylight switch to your lighting system.
What You Need
Before we dive into the steps to connect a daylight switch, you will need to make sure you have the right tools and equipment for the job:
- Daylight switch
- Screwdriver
- Wire stripper
- Electrical tape
- Wire nuts
- Electrical wires (make sure they are the same gauge as the existing wiring in your house)
Step 1: Turn Off the Power
The first step is to turn off the power to the lighting system you will be working on. Flip the switch on the breaker box to turn off the circuit to the lighting system. This is important to avoid any electrical accidents while you are connecting the daylight switch.
Step 2: Remove the Existing Light Switch
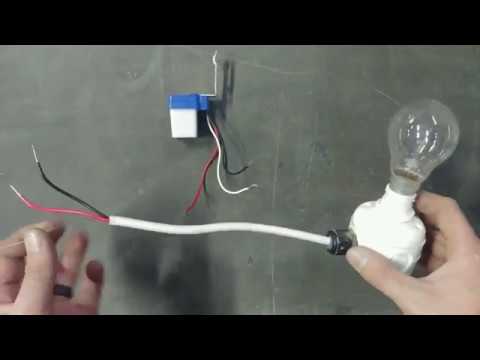
Next, you need to remove the existing light switch from the wall. To do this, use a screwdriver to remove the screws that hold the switch plate in place. Carefully pull the switch plate out of the wall to reveal the wiring behind it. You should see three wires connected to the switch: a black wire, a white wire, and a green or bare copper wire.
Note: If the switch box contains more than one wire, consult an electrician or the manufacturer's instructions.
Step 3: Connect the Daylight Switch
Now it’s time to connect the daylight switch. First, make sure you have a good understanding of the switch’s instructions. Most daylight switches come with clear instructions which should guide your wiring process. Connect the three wires on the daylight switch to the three wires you had disconnected from the original switch. The black wire on the daylight switch goes to the black wire on the original switch, the white wire goes to the white wire, and the green or bare copper wire goes to the ground wire.
Note: Be sure to use wire nuts to connect the wires which will maintain a tight connection between the wires.
Step 4: Mount the Daylight Switch
After connecting the wires, it’s time to mount the daylight switch onto the wall. Screw the switch in place, working carefully to avoid any damage. The switch should be flush with the wall once installed.
Step 5: Turn On the Power
Now that the switch has been installed, turn on the power at the circuit breaker box. Test the switch by flipping the switch on and off. If everything is working properly, the light should turn on and off automatically based on the ambient light level.
Conclusion
Congratulations! You now know how to connect a daylight switch to your lighting system. This is a fantastic way to save energy and reduce your electricity bill.